Do you think your processor is running a little too hot?
Have you tried water cooling but think it’s a little too weak? Do you want to
push the limits and squeeze the last megahertzes out of your system? Then this
could be a product for you.
Do you think your processor is running a little too hot?
Have you tried water cooling but think it’s a little too weak? Do you want to
push the limits and squeeze the last megahertzes out of your system? Then this
could be a product for you.
Most people today have heard of the company Asetek. If not, you can usually
hear a bell ringing if Waterchill is mentioned, or even Vapochill which was
the company’s original product. At the beginning, Asetek was only offering Vapochill
in their selection. Nowadays they’ve widened a lot and keep many water cooling
products, compete kits and some other compressor cooling devices in their selection.
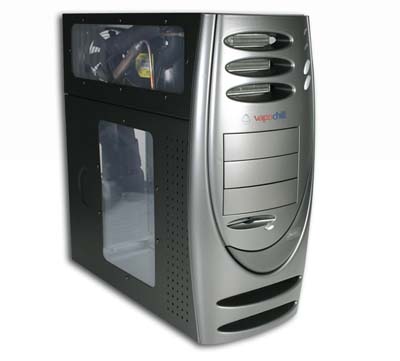
Today we’re taking a look at their newest creation in phase change cooling devices,
Vapochill XE II, their most powerful solution so far, almost. Actually, they
have a more powerful creation in store, Vapochill Lightspeed, but that’s an
external solution. On this product, everything is mounted in a case and you
only need to put in your components.
In this niche there are no direct competitors. There’s a company that delivers
complete phase change solutions, ECT (Extreme Cooling Technologies), earlier known
as nVentiv, even earlier known as ChipCon (almost a bit tedious, isn’t it?),
though they only have external devices in their product range and only compete
against Asetek’s external solution (Lightspeed). Lack of competition is normally
not good in the customer’s perspective, but you could also think that one
manufacturer is better than none at all. There are matching cases to both Asetek’s
Lightspeed and ECT’s solution, but then you have to put it together on your
own responsibility, which is not the case here, since everything’s already mounted.
First of all we will do a very concise (very concise, since we’re
going to explain phase change cooling more thoroughly in the future here at NH)
summary on how a cooling device based on compressors really works and why it
gives such low temperatures.
We’ll begin by looking at air cooling, the most common method of cooling the
processor, and watercooling, probably the second most common. They have one
thing in common; they use a constant medium, which means that no transformation
takes place (no material changes form from i.e. solid to liquid or liquid to
gas form).
Air cooling
An ordinary heatsink with fan, the most occuring form of cooling. The
heatsink leads the heat from the processor to a larger number of fins with a
significantly larger surface area than the processor itself. A fan blows (in
some cases suck) air over/through the fins that are cooled and hot air flows
out.
Water cooling
Water cooling has a certain advantage. Water is first and foremost
a better medium than air when it comes to transferring and storing heat. We
can use water to transport the heat away from the processor faster, and we transfer
the water to a radiator, a heatsink for the water that can be a lot bigger than
there is space for if you make sure it would have been seated directly on the
processor.
Phase change
Now we’re getting to something here. Here we can get below the room/ambient
temperature, which isn’t possible with air nor water. How is this possible then?
We use the larger amount of energy required to make matter pass from liquid
to gas. Here’s a simple experiment to understand. Wave strong with your hand
in the air. It will get cooler. Put some acetone on your hand and wave. Feels
pretty cool, doesn’t it? acetone boils off pretty fast (evaporates is a more
common word) and when it does (going from liquid to gas form), the acetone uses
heat energy from your hand, which gets cold. It works with water aswell, but
it’s a significant difference with acetone, which feels a bit cold even when
you’re not waving with your hand. In a compressor cooling device acetone isn’t
used, but some different cooling mediums such as R404 and R507, mediums that
have a boiling point in the lower subzero area.
So you “pour” a liquid onto your processor, or more precise in the
cooling head that is fastened to the processor where the liquid boils off and
becomes a gas form. This is the process that cools your processor. For the whole
thing to work in a sealed system you have to make the gas revert to liquid form
so that you can “pour” it again. This is where the compressor comes
in. It compresses the gas under pressure. Under pressure, the gas gets warm
and we cool it off with the condensator (the radiator) which makes it pass to
liquid again which once again goes to the processor. A simplified principal
sketch looks like this:
 [Editor’s note: CPU -> Compressor -> Condenser] |
Of course there’s a little more than this that makes a compressor cooling
device, like capillary tubes, the proper cooling mediums, effect and so on,
but we’ll stop here and get back to compressor cooling devices in the future.
Enough about the introduction and background information. It’s time to take
a closer look at Vapochill XE II!
|
Specifications: Vapochill XE II
|
|
|
|
Cooling performance :
|
180W @ -18’C / 0W
@ -44’C
|
|
Chassis:
|
Black, windowed
side panel
|
|
Form factor:
|
ATX
|
|
External
5,25” bays:
|
3
|
|
External
3,5” bays:
|
1
|
|
Internal
3.5” bays:
|
5
|
|
Dimensions:
|
560x260x560 mm
|
|
Weight:
|
18kg
|
|
CPU-kit 1:
|
AMD S754/939/940
& Intel S478
|
|
CPU-kit 2:
|
Intel Socket T
(LGA 775)
|
|
Coolant:
|
R507
|
That looks kind of nice, doesn’t it? Even though there is no Socket A support
I doubt anyone will miss it, since a cooling-equipment of this caliber and
price isn’t really necessary on an older Socket A system. The main objectives
are instead AMD64, AMD FX and Intel Prescott with socket 939, 775 and 754. The
number of external 5,25” bays may seem few, but really, how many of us
are using more than 3 external 5,25″ bays? Besides, this solution is
mainly for overclockers and such, not as much for modders and gamers, who are
in a bigger need of external bays.
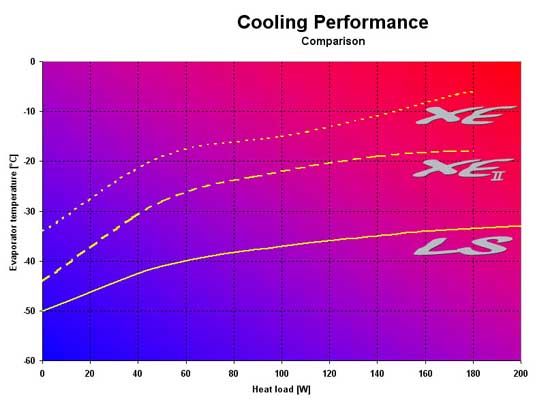
Here’s a diagram from Asetek themselves that shows what kind of
temperatures we can expect with the XE II:
We’ll be testing with an FX 53, it’ll be interesting to see
how well the temperatures on the diagram correspond with our temperatures. But
of course, there are a lot of differences concerning methods, the surrounding
temperature, mounting and so on, but hopefully the results won’t be too far
from Asetek’s diagram.
And here’s the unit at all its glory:
On the next page we’ll take a look under the hood and
see what the Vapochill Extreme Edition II has to offer.
Let’s begin with a closer look at the cooler:
Here we see the compressor, the condenser and the
cooling head among others, on page 2 there’s a guide to phase change.
Here you go, more pictures:
On the left we have the ChillControl, and on the
right is the power unit for the ChillControl. A unit that plugs in to a
USB-port, with which you can control starting temperature, control fans,
monitor the current temperature. A couple of heat pads are also plugged in
here. One of these pads is mounted in the cooling head, one behind the
mainboard and there’s also one on the pipe to the CPU. However, we had some
problems with out ChillControl and won’t include it as a part of the review.
This isn’t anything that affects the customer though, this only concerns our
beta-product.
Now we know how the system looks, but how does it
perform? First let’s take a quick look at the test system.
|
Test system
|
|
AMD Athlon64 – Socket 939
|
|
Processor:
|
AMD Athlon 64 FX53 (2.4GHz, 1MB L2-cache, 2GHz HT)
|
|
Mainboard:
|
Abit AV8 3rd Eye
|
|
RAM:
|
1GB Corsair XMS3200 DDR-SDRAM
(2 x 512MB, DDR-400, 2-2-2-5-11 timings)
|
|
Graphics card:
|
Radeon 7500LE
|
|
Harddrive:
|
46GB IDE IBM Deskstar
|
|
PSU:
|
OCZ Powerstream Adjustable 520W
|
|
Cooling:
|
Vapochill Extreme Edition II
Zalman ZM7000B-CU (max RPM)
|
|
Temperature
meter:
|
CIE 307
|
|
Software
|
|
Operating system:
|
Windows XP Professional SP2
|
|
Resolution:
|
1024x768x32bit, 75Hz
|
|
Graphics drivers:
|
ATI
Catalyst 4.12
DirectX 9.0c
VIA Hyperion 4in1 4.55v
Athlon 64 Processor driver 1.1.0.0
DivX 5.2.0
Xvid 1.0.2
|
|
Test programs:
|
Sisoftware Sandra
2005 1.10.37
PCMark04 Build 120
AutoGordian Knot v1.60
Audioactive Production Studio 2.04j (Fraunhofer II encoder)
WinRAR 3.4
CPU-Z v1.24
Prime95
|
What we want to find out is how much we can overclock the
CPU and what kind of performance increases we’ll get (focusing on the CPU, because
the vapochill only affects the CPU). Since AMD’s FX CPUs aren’t multiplier
locked we’ll hopefully be able to keep the original FSB frequency when the CPU
is overclocked. When overclocking a CPU with a locked multiplier, like AMD64
and Intel CPUs (except for the Extreme Edition), there’s a performance increase
with the FSB being higher. But then you’re depending on memory frequency and
memory timings, and that’s something we don’t want to be in this review.
We’ll also be comparing the performance differences between vapochill and
regular air cooling. The air cooling heatsink we’ll be using is the Zalman
ZM7000B-CU, considered to be one of the best, not too expensive either.
For measuring temperatures, we used a Cie 307 thermometer
with two temp. sensors glued to the CPU. The average values of these two
temperatures are later used in the review.
Before we start the testing, here are a couple of words
about the installation.
The installation as a whole is simple, assemble the parts of the cooling head, seal the socket, mount the backplate and screw it into place (in short terms). When the power supply is sitting where it is:
It might be a bit tricky at first sight. The power supply unit mounts after everything else is in place, also make sure that you have connected all the mainboard connectors, they might be hard (or impossible) to reach after the power supply is mounted. Small details, but things that might be a source of irritation. Our power supply unit, OCZ Powerstream, didn’t fit properly. It would have been necessary to cut off a piece of the plate by the plastic connector where you plug in the 230V AC connector.
A small interference, but not something we carry out on a test sample. Worth remembering is that it might be possible to fix it, since OCZ’s power supplies may be the first choice for many who choose this type of cooling. Another thing worth mentioning is that the backplate, which you mount behind the mainboard, is a bit weak and bends easily. A significantly thicker and sturdier backplate would have been preferable. Another detail is that the mainboard is mounted with plastic plugs instead of screws, a matter of taste, but I like screws better. It might have been preferable with the opportunity to use both. Instead of trying to install the cooling head inside the case I removed the whole tray and mounted it outside. I then moved the whole thing back in with everything already installed.
It felt easier to keep an eye on the mounting procedure this way, this is also a matter of taste but maybe something to try since it may take a few mounting attempts before you get a good result. You should be careful so you don’t pull the hose to the cooling head too much.
If we continue in this skeptical manner we might say that the case feels a tad low quality. To Vapochill’s defense one could argue that they in most possible ways have tried to keep the costs low since it already is such an expensive product. But at the same time one might wonder why they don’t increase the price slightly to include a better case for a product that is so expensive. Would a raise of 600 SEK have an influence on the choice for those who are about to buy a product that costs ten times as much? It’s hard to speculate about. Now it’s time to start with the real fun, the tests, and we start of with overclocking.
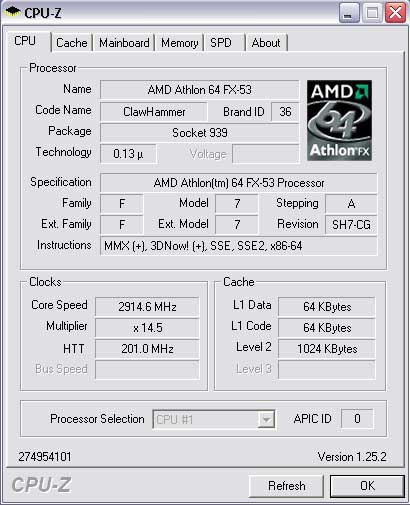
To get a good overview we actually start off with the overclocking and figure out at which speeds we are going to run the tests. The original frequency, 2400 MHz, is a foregone participant and with the Vapochill running we managed to reach 2914 MHz. It might not seem to be so high, but it is stable for 30 minutes in Prime95’s torture test. With air cooling we reached 2613 MHz, this isn’t a record result either, but once again it is stable for at least 30 minutes of torture test.
|
 [Editor’s note: Luft means air in swedish] |
If we had settled with for example 3DMark as a stability test we would probably have been able add another 100 MHz or so on the results. To make it more clear we entered the results into diagrams.
Overclocking
|
|
|
| Vapochill XE II |
 |
2914 |
|
| |
| Zalman ZM7000B-CU |
 |
2613 |
|
| |
| Original frequency |
 |
2400 |
|
| |
|
 |
| |
0 |
700 |
1400 |
2100 |
2800 |
3500 |
|
|
We also tested how high we could go and still being able to take a screenshot with Cpu-z, it resulted in the not too bad 3166 MHz.
When we started the testing we began with Vapochill XE II and later moved on to air cooling and despite everything there was some disappointment over the 2914 MHz from the beginning. We had hopes to cross the 3 GHz boundaries, which would have felt a bit like a milestone. But after the testing with air cooling the results with Vapochill suddenly felt pretty nice and totally OK again. What do we want to find out now? How much performance do we gain with Vapochill compared to the original frequency and the overclocking with air cooling? Let’s move on to our benchmarks.
Audioactive Production Studio – MP3 encoding
First out is some encoding and we start off with mp3 encoding. This time we will use AudioActive and Fraunhofer codec to measure the performance. Lower times are of course better.
Audio Active Production Studio 2.0.4j – MP3 Encoding
Fraunhofer IIS, 143MB wave, 192KB/s 44,100 Hz stereo HQ encoding (sec, less is better) |
|
|
| 2914 mhz |
 |
79 |
|
| |
| 2613 mhz |
 |
88 |
|
| |
| 2405 mhz |
 |
96 |
|
| |
|
 |
| |
0 |
24 |
48 |
72 |
96 |
120 |
|
|
There isn’t anything exiting to see here. What we can look at is the percentage increase of performance, and see how it varies in the different tests. We will also calculate an average of all the tests when we’re finished. Here we can see an increase of 17,7 percent with the Vapochill and 8,3 percent with air cooling.
AutoGordian Knot – DivX, Xvid encoding
Followed by DivX and Xvid encoding with AutoGordian Knot. A higher FPS is better.
AutoGordian Knot v1.60 – Xvid 1.0.2 Encoding
33MB MPEG2, 75% Q, Auto Rez. No Sound (fps) |
|
|
| 2914 mhz |
 |
32.22 |
|
| |
| 2613 mhz |
 |
29.63 |
|
| |
| 2405 mhz |
 |
27.63 |
|
| |
|
 |
| |
0 |
8 |
16 |
24 |
32 |
40 |
|
|
There isn’t really much to comment on the results, they both speak for themselves and meet our expectations. In Xvid we can see a performance increase of 16,6 percent respectively 8,7 percent.
AutoGordian Knot v1.60 – DivX 5.2.0 Encoding
33MB MPEG2, 75% Q, Auto Rez. No Sound (fps) |
|
|
| 2914 mhz |
 |
44.09 |
|
| |
| 2613 mhz |
 |
40.06 |
|
| |
| 2405 mhz |
 |
37.54 |
|
| |
|
 |
| |
0 |
10 |
20 |
30 |
40 |
50 |
|
|
If we look at the results from the DivX encoding it is almost similar with 17,4 percent for Vapochill but the performance gain with air cooling was slightly less then expected with 6,7 percent.
Futuremark PCMark04
A suitable test for our review is PCMark04’s CPU Test:
PCMark04 build 1.2.0
CPU Test Suite (higher is better) |
|
|
| 2914 mhz |
 |
5396 |
|
| |
| 2613 mhz. |
 |
4913 |
|
| |
| 2405 mhz |
 |
4523 |
|
| |
|
 |
| |
0 |
1200 |
2400 |
3600 |
4800 |
6000 |
|
|
In this test we once again receive similar results although Vapochill scored a little higher than in the previous tests with its 19,3 percent. The overclocking with air cooling resulted in a 8,6 performance gain in this test which is very similar to the mp3 and Xvid encoding. We move on
SuperPi
The Pi programs have been extensively used for performance testing and fit in
nicely in our tests. That lets us use other systems as a comparison to an extent.
You can find both SuperPi and PiFast in out Performance Center, where you can
download both the programs and guides on how to use them. Find them here.
SuperPi
1M calculation (sec, less is better) |
|
|
| 2914 mhz |
 |
30 |
|
| |
| 2613 mhz. |
 |
32 |
|
| |
| 2405 mhz |
 |
35 |
|
| |
|
 |
| |
0 |
8 |
16 |
24 |
32 |
40 |
|
|
14,3 percent for the vapochill is a little below expectations, but SuperPi
isn’t being completely honest since it rounds to whole seconds, and the last
percentage points have probably been rounded off in this case. Air-cooling gave
8,6 percent.
PiFast
PiFast is considered better than SuperPi by many. It gives a more accurate
result, and we’ll see if we can’t get different results for the vapochill when
rounding factors are eliminated.
PiFast 4.3
(sec, less is better) |
|
|
| 2914 mhz |
 |
32.47 |
|
| |
| 2613 mhz. |
 |
35.13 |
|
| |
| 2405 mhz |
 |
37.66 |
|
| |
|
 |
| |
0 |
9 |
18 |
27 |
36 |
45 |
|
|
Apparently, that wasn’t the case. The results are slightly lower when compared
to SuperPi, you get a little more bang-for-the-buck from all those overclocked
MHz with SuperPi. The Pi tests also have the worst response to our overclocking
attempts. For PiFast, the numbers were 13.6 and 6.7 percent. .
SiSoftware Sandra 2005
Sandra is what we would consider a very synthetic test. Sandra usually
reflects numbers that are far from the systems actual performance, but we’ll include
the testing for reference anyway, giving us the possibility to run two pure cpu
tests we wouldn’t want to miss. We’ll start with Vi börjar med Arithmetic
SiSoft Sandra 2005 CPU Arithmetic
(higher is better) |
|
|
| 2914 mhz ALU |
 |
13298 |
|
| |
| 2613 mhz ALU |
 |
11949 |
|
| |
| 2405 mhz ALU |
 |
10981 |
|
| |
| 2914 mhz FPU (iSSE2) |
 |
6095 |
|
| |
| 2613 mhz FPU (iSSE2) |
 |
5468 |
|
| |
| 2405 mhz FPU (iSSE2) |
 |
5034 |
|
| |
|
 |
| |
0 |
3100 |
6200 |
9300 |
12400 |
15500 |
|
|
On the ALU we get 21.1 and 8.8 percent increase respectively, and for FPU (iSSE2),
identical 21.1 for vapochill och similar 8.6 percent for air-cooling are obtained.
These numbers reflect the actual the over-clocked frequency quit accurately. Now
to take alook at the CPU multimedia performance also.
SiSoftware Sandra 2005 CPU Multi-Media
(higher is better) |
|
|
| 2914 mhz Float. |
 |
29874 |
|
| |
| 2914 mhz Int. |
 |
27673 |
|
| |
| 2613 mhz Float. |
 |
26795 |
|
| |
| 2613 mhz Int. |
 |
24817 |
|
| |
| 2405 mhz Float. |
 |
24652 |
|
| |
| 2405 mhz Int. |
 |
22863 |
|
| |
|
 |
| |
0 |
7000 |
14000 |
21000 |
28000 |
35000 |
|
|
Even here we see that the points scale almost identically with 21.0 and 8.7 procent
for integer integer, and 21.2 and 8.7 Floting-Point. These results can be directly
translated from the increased processor. Now to sum up the results
Taking a look at the average performance gain for respective colling technique,
we get 18.33 for vapochill, and 8.24 for air cooling. What we also calculate is
the percentage of the over-clocked frequency. Those numbers turn out to be 21.2
for vapochill and 8.6 percent for air cooling. See the diagram below for a better
overview.
Combined performance
(percent, %) |
|
|
| 2914 MHz frequency increase |
 |
21.1 |
|
| |
| 2914 MHz performance increase |
 |
18.33 |
|
| |
| 2613 MHz frequency increase |
 |
8.6 |
|
| |
| 2613 MHz performance increase |
 |
8.24 |
|
| |
| 2405 mhz orginal |
 |
0 |
|
| |
|
 |
| |
0 |
5 |
10 |
15 |
20 |
25 |
|
|
In a perfect world with perfect tests, the green and red bars for respective clock
frequencies would have been the same. That’s of course not the case, but the results
couldn’t be much closer, especially if we consider the air cooling results, which
is impressive. An incres in processor frequency will give you an slmost identical
increase in performance. We’re actually not sure why there is such a large discrepancy
for the vapochill results. The problem is most clear with the SuperPi test, where
the air-cooling solution is at a perfect 8.6 percent, while the vaopchill falls
down to 14.3 percet compared to the 21.1 percent frequency increasae. We really
don’t have an answer at the moment.
Before we get to a conclusion we’ll take a look at the temperatures also, a rather
vital part of the test.
The temperatures, a both important and interesting part of this test. As we mentioned earlier, we will be using a separate thermometer. To claim one has a certain temperature on the processor can be both difficult and dangerous. Asking “How hot is your processor” can be compared to asking “How long is a string?”. To give a fair comparison between temperatures, everyone would have to use the same standard for the measurements, the same instruments, and measure the temperature on the exact same spot with the same voltages etc. The constraints eventually become impossible to fulfill. Simply exchanging the main board, or even the BIOS version will give differing results.
We will use an external temperature sensor since we’ve heard that the Abit board has some issues with temperature registering. It also has an, for this test, irritating weakness in that it will not post temperatures below zero. So we have two sensors glued to the processor:
The sensor on the right in the above image is a little loose if anyone wonders. This happened after the testing when I moved the board for taking pictures. So if we have a look at the temperature we’ve been able to gather up we get the following graph:
Comparing the results is like comparing apples and oranges. The Vapochill XE II
delivers temperatures well below zero throughout the entire test. The air cooling temperatures still look really good, but we have to remember that they’re measured against the IHS, and not the internal temperature diode. The internal diode showed values that were much higher, we got results upward 80 degrees at 2613 MHz load. We don’t really have a way of comparing this to the Vapohill since the main board doesn’t show temperatures below zero. We can say, however, that since the internal diode showed zero degrees constantly, the temperature was most likely always below zero throughout the test, while it took off toward 80 degrees with the air cooling. It’s worth mentioning that with the Vapochill we could have had a maximum difference of 10.9 degrees between our temperature sensor and the internal diode at maximum load (seeing as the main board showed nothing and must therefore have been somewhere below zero). Meanwhile, the difference from the air cooling reached almost 40 degrees.
Why we experienced such a difference with the air cool we can’t really say, we definitely want to look into it more deeply. More tests, more cooling methods, different main boards, and tests without the IHS would probably shed some light on this phenomena. We hope to get back to this in the near future.
If we now look back at Asetek’s diagram, we can see if our expectations proved to be true. For starters, we need to find the heat dissipation for our FX53. Glancing over at AMD, we find that it developes 89W at full load with default values.
At 89 Watt heat dissipation, the temperature should be somewhere around -23 degrees,
our measurements showed -17.7, 5 degrees vid våra mätningar hamnade vi på -17.7, 5 degrees warmer in other words. This is definitely within the realm of negligible. A fairly decent result when including such factors such as construction, measurement methods, and ambient temperatures, etc, into the calculations.
When we increase the clock a bit, and end up at -10.9, we should, according to the diagram, be dissipating well over 180 W, thermally. This, however, is probably not the case. Asetek has probably measured the temperature with chillcontrol which takes the temperature at the """
kylhuvudet""", where it’s probably a little colder than at the IHS where we measured. As we mentioned earlier, this is why the results always have to be taken with a grain of salt. We also don’t know at which ambient temperature Asetek has taken their measurements for the diagram. With that in mind, the temperatures are definitely acceptable, not to mention really nice. We noticed the same results from the overclocking.
So, nearing the end, it’s time to sum things up. On to the conclusions.
And so we come to the conclusion at last. Now who would you imagine buying this product? The targeted group will most likely be those performance crazy overclockers and gaming maniacs with extreme performance demands.
With the new and powerful SLI-system on the market, graphics cards are not the most needed part anymore, and the processor has increased somewhat in importance. This is an excellent alternative to pepping up you’re processor a little. This picture can be read, showing just that.
Now days, you can get pretty far having 2914 megahertz baggaged with an FX. The 300 megahertz increase compared to the air cooled overclocking is is quite impressive having in mind that our processor was not in the best of moods.
Asetek is offering a solution which includes extreme cooling, complete with a user friendly chassi which exceeds water cooling. The fact that it is one of a kind makes it even harder not to like it, rather than nothing. There are quite a lot of pros, but also some cons to be mentioned. Once bought, you are glued to it, unless you want to buy the new vapochill model extern to combine with a brand new chassi, or maybe taking the challenge of serious modifications. The chassi even feels sort of "flabby", thin plate and the feeling of quality does not quite appear. Unfortunate with a product in that price class. The question being, does a "bencher" care about this? All in all its an enjoyable product, but it has tough competition with vapochills own Lightspeed and ECT’s opposite. Sure, none of the others are complete including chassies, but they do have a higher
cooling effect and question is, weather the small group of overclockers who are intended buyers of the XE II really will be satisfied with second highest performance only because there is no chassi included. Personally, i don’t think so, but time will show.
Asetek Vapochill XE II
|
Pros
+ Cooling capacity
+ Overclocking possibilities which it supplies
+ Easy to use
+ Relatively silent
+ Fits almost all processors
Cons
– Price
– Chassi
– OCZ power supply does not really fit
– Fastening arrangement, especially the back plate feels somewhat weak
– Placement of the power supply
– There are better performing products
|


