


As one of the leading manufacturers of cooling systems for computers, Asetek has an entire range of products to rectify this increasing problem. Today we will look at a complete water cooling package from Asetek with the designation CPU Power Kit KT03A-L30. What differentiates this from earlier packages is that Asetek has introduced a new and bigger radiator in their range.
We’ll see what conceals itself behind this somewhat cryptical model designation.
As the development of processors, graphics cards and motherboards advances,
so does the requirement of cooling these components. Heat dissipation increases
exponentially as the frequency increases and in spite of more and more advanced
manufacturing processes to dampen this dissipation, the resulting wattage increases
in the micro processors of today.
As one of the leading manufacturers of cooling systems for computers, Asetek
has an entire range of products to rectify this increasing problem. Today we
will look at a complete water cooling package from Asetek with the designation
CPU Power Kit KT03A-L30. What differentiates this from earlier packages is that
Asetek has introduced a new and bigger radiator in their range.
We’ll see what conceals itself behind this somewhat cryptical model designation.
|
|
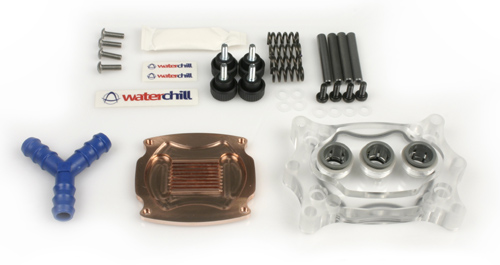
CPU Power Kit KT03A-L30 – Contents |
|
| CPU block | WaterChill Antarctica |
| Radiator | RDT02 120mm Triple (modified Black Ice Pro III) |
| Pump | Hydor L30 |
| Water tank | WaterChill Plexi glass Reservoir |
| Tubing | WaterChill Tube Set (2.5m) |
| Fans | Adda 120mm (3pcs) |
| Accessories | WaterChill Control Unit Tube connectors Algaecide (10ml) Thermal grease(2ml) Manual |
| Price | ~2600 SEK |
 |
 |
 |
Contents in CPU Power Kit KT03A-L30 |
||
As it appears, the package includes everything that you need to water cool
your processor. This package in particular is adjusted for tubes with 1/2″
(12.7mm) in outer diameter, but a 10mm version is also available. The basic
idea behind water cooling is to expose a greater surface to the air, to more
effectively transfer the heat away.
The vital in a water cooled system is thus the block and the radiator. The water
block must gather the heat from the processor and then emit it to the water
as effectivaly as possible. Then the radiator’s material will gather as much
heat as possible from the water and emit this to the air. The more effectively
this transmission is made, the more effective the system is. We will soon take
a closer look on the main components in the package but first a comment about
the price.
We’ve so far not found the Asetek KT03A-L30 package with a triple radiator in
swedish retail stores and therefore we don’t have an exact price. But the same
system with a double radiator costs about 2300 SEK, which makes an estimated
2600 SEK a trustworthy price for the package we’re testing here today. It’s
a lot of money for a water cooling system, without a doubt. The question is:
Is it worth your money? That’s what we’ll try to find out now.
The CPU block
 |
|
WaterChill Antarctica |
|
| Design | WhiteWater |
| Compatibility | Intel socket 478, AMD socket 462/754/939/940 (Intel socket 775 requires a different plexi glass top) |
| Connections | 1/2″ (12.7mm) ”Push-in” connectors |
| Material | Base: Copper Top: Plexi glass |
| Dimensions | (length, width, thickness) |
The block has a base of copper and a top of plexi glass which makes a genuine
impression. The connectors are lowered into the top. They are of the ”Push-in”
type, which means that you only need to push down the tube to make it fasten and
tighten. Further on, the top has several holes that are adapted for the different
platforms that they fit on. The allround top, which is included as a standard
feature in the package, supports all modern socket types except for socket 775
from Intel. The users of this socket can buy another top that is meant for that
platform. A disadvantage with the allround top is that to make it fit socket 754/939/940,
it has to restrict on the design specifications for socket 478 and socket 462.
This means that some socket 478/462 motherboards could have components that are
too high, restricting space for some mounting ears on the block.
 |
 |
 |
Waterchill Antarctica |
||
The radiator
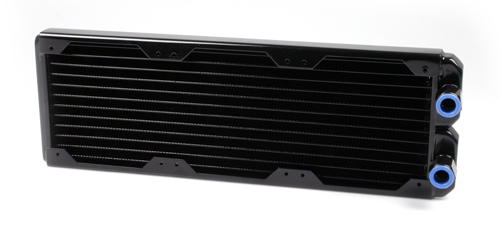 |
|
RDT02 120mm Triple (modified Black Ice Pro III) |
|
| Design | Flat tubes |
| Heat dissipation | 1732.5 kcal per hour (2015 W) |
| Connections | 1/2″ (12.7mm) ”Push-in” connectors |
| Fans | Available space for 3pcs of 120mm fans |
| Material | Copper |
| Dimensions | Length: 397mm Width: 133mm Thickness: 25mm |
Asetek has chosen to include this gargantuan radiator from Hardware Labs, who
have designed it for water cooling of computers in particular. The radiator is
made of plane pipes and thin fins to guarantee good heat dissipation and low flow
restriction. According to Hardware Lab themselves, the heat dissipation of this
radiator is more than 4 times better than their own radiator made for a 120mm
fan. This means that you probably won’t have to worry about changing the radiator
if you want to extend the system to cool your graphics card and north bridge.
A disadvantage about the radiator is of course that it’s large; you should measure
the space that is going to be occupied by the radiator before you buy it. Worth
thinking of is that the specified dimensions are for the radiator only. You should
keep in mind that the connectors and the fans increase the thickness by about
25mm, also that you mustn’t let the tubes bend too much directly after the connectors.
 |
 |
 |
Black Ice Pro III |
||
 |
|
Hydor Seltz L30 II |
|
| Pump type | Centrifugal |
| Pump capacity | 1200 liters per hour |
| Connections | 1/2″ (12.7mm) ”Push-in” |
| Power consumption | 14W |
| Dimensions | Length: 114mm Width: 76mm Height: 89mm |
| Mounting | Screws or suction-cups |
A pump from Hydor constitutes the heart of the system. It is a model L30, modified by Asetek to provide tube-couplings compatible with the rest of the system. Despite a restrictive water block and a large radiator the pump has no problems maintaining a steadfast flow throughout the entire system. Mounting the pump can be done with either screws or suction-cups. Unless you’re planning on moving your system around a lot, the suction-cup alternative is recommended, as the cups efficiently minimize vibrations from the pump. Included in the kit is a mounting-bracket giving the reservoir proper elevation for attaching directly to the pump.
 |
 |
 |
Hydor Seltz L30 II |
||
Accessories
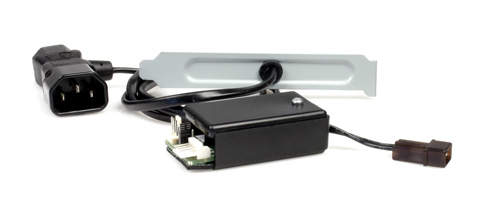 |
|
Accessories |
|
| Fans | 3 ADDA 120x25mm, AD1212MS-A71GL |
| Reservoir | WaterChill Plexiglas Reservoir |
| Tubing | 1/2″ (12.7mm) outer diameter |
| Control | WaterChill Control Unit |
| Water add-on | WaterWetter 10ml |
| Cables | Y-split power cables for fans. Power cable for pump, routed through PCI IO-shield. |
Here we have the brain of the system. The WaterChill Control Unit activates the pump as the computer starts up. No more forgetting to turn the pump on, and no more disassembling power supplies to solder wires and relays in order to achieve the same level of functionality. The reservoir, made out of aluminum and Plexiglas, has just like the rest of the system been fitted with painless “push-in” sockets.
 |
 |
 |
 |
 |
 |
Accessories |
||
This kit gives a remarkable overall impression. On paper all components appear to be matching each other. We believe Asetek have made a very wise choice of components. The water block is of tried-and-proven design and known to perform exceptionally well. The radiator is large and has good heat-dissipation. The pump is a common sight in water-cooled computers and spare parts are abundant.
Installing a water-cooling kit in a computer chassis can be a time-consuming project, and the level of difficulty may vary extensively depending on the chassis. This review will not touch on any installation-specific issues beyond mere assembly of the kit’s various components. Asetek recommends a system assembly allowing water to flow in the following order:
Reservoir -> Pump -> Radiator -> Water block -> Reservoir
Here’s a schematic from Asetek.
 |
Direction of flow |
A tip along the way is to mount the pump as low as possible. The pump is of centrifugal type and has no direct drawing-ability to speak of, especially not if there is air caught in the system. Hence the reservoir should be placed above the pump. Another thing worth keeping in mind is the radiator and the amount of warm air it produces – it should be mounted in a manner expelling air. Once matters of how and where everything should sit in the case it’s time to mount all components to their respective places.
Detailed instructions for mounting the CPU-block are included in the manual, which thoroughly describes the installation-process for all supported platforms. The water block is mounted on spacers attached from the motherboard’s backside, and held in place from the front by spring-loaded thumbscrews mounted onto the spacers. The thumbscrews are of larger model and there is no trouble tightening them sufficiently. As the second picture shows, the springs provide enough tension to make the whole motherboard warp, which indicates a nice and thorough pressure against the CPU.
 |
 |
 |
 |
 |
 |
Mounting socket 478 |
||
Thanks to the push-in connectors, attaching a tube is easily done with a good push. Before attaching the last tube we tested the system by blowing in the one end and holding the other, thus checking for leaks. Luckily, this way we discovered we had a loose connection on the water block. Once fixed the system was perfectly sealed. Next to be plugged in is the Chill Control Unit, basically consisting of a relay telling the pump to start with the computer. The CCU is in part fed with 230V via a cable running through a PCI IO-shield, along with 12V and 5V from the power supply. Even the radiator-fans can be connected directly to the CCU, which supplies them with either 12V or 7V, depending on a jumper setting.
The system is now ready to be filled up and put through a trial run. We filled the system through pouring as much water as possible into the reservoir and then starting the pump, by means of hotwiring the power supply. As the pump filled the system with water we kept adding more until full. Letting it all run for a few hours allowed all air to find it’s way out of the radiator and water block. Everything should be rigged and ready for testing!
Mounting and installation of the various components were effortless endeavors. All steps are thoroughly explained in the included manuals. Everything possibly essential for installing this water-cooling package into virtually any computer is included in the kit. Thanks to the Chill Control Unit no additional steps are required to start the pump, and day-to-day usage is no more troublesome than with that of an air-cooled system. A minus for the mounting of the reservoir though – we would have liked to see a solution allowing the reservoir to be screw-mounted directly to the included mounting-bracket.
 |
|
Test system |
|
| Hardware | |
| Mainboard: | Abit IC7-G, BIOS 26 |
| Processor: | Intel P4 3.2E (Prescott) |
| RAM: | Kingston HyperX 3500 2x256Mb |
| Power supply unit: | Antec TruePower 430W |
| Test cooling: | Asetek CPU Power Kit |
| Reference cooling: | Zalman CNPS 7000Cu |
| Software | |
| Operating system: | Windows XP (SP2) |
| Monitoring program: | Motherboard Monitor 5.3.7.0 |
| Stress program: | Prime95 22.12.1 |
Our test system is based on Intel’s socket 478-platform with Intel’s latest processor generation. We chose a Prescott processor for this test since it is famous for emitting a lot of heat. As you can see in the test results, this particular processor was no exception. We chose Zalman’s CNPS 7000cu as reference cooling. The Zalman is a massive copper heatsink which we have reviewed earlier on our Swedish speaking site. That review can be found here.
Definitions |
|
| Idle | An hour in Windows without workload |
| Load | An hour with double instances of Prime95 |
| Stable | No errors reported by Prime95 under load |
| Processor temperature | The temperature of the processor as reported by Motherboard Monitor |
Double instances of Prime95 have shown to be very effective in the search for stability. The reason for why we are running double instances is that the processor has HT-support. Only running one instance means that the processor only gets a 50% workload.
It is important to comment on the measuring of temperatures for this test. We have chosen to rely on the internal temperature reporting from the processor. It is widely known that different mainboard manufactures use different methods to calculate this signal from the processor and thereby report different temperatures. The general opinion is that the manufacturer Abit generally report higher temperatures than other manufacturers. We want to point out that one should note the difference in temperatures rather then the temperatures themselves.
 [Editor’s note: diagram is not to scale] [Editor’s note: diagram is not to scale] |
||
Intel P4 3.2E @ 3200MHz, 1.3875 vcore. |
||
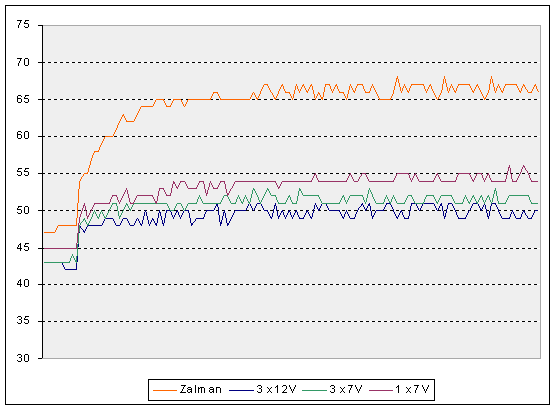
| Idle | Load | |
| Zalman 7000Cu | 47 | 67 |
| WaterChill Power CPU Kit, 3 fans @ 12V | 43 | 50 |
| WaterChill Power CPU Kit, 3 fans @ 7V | 44 | 51 |
| WaterChill Power CPU Kit, 1 fan @ 7V | 44 | 54 |
The absolutely most striking is the difference in temperatures between the air cooling and the water cooling. No matter how we configured the cooler with the fans it had no problem in beating the air cooling. We can see that the radiator’s large surface area makes it possible for the water cooling to perform acceptable without having a lot of airflow through the radiator. Worth mentioning is that we had the radiator mounted in an open environment which means that the temperatures would have been a bit higher if the radiator had been mounted inside the case.
Now it’s time to increase the frequencies a bit. We noticed quite quickly that Zalman’s heatsink just couldn’t cope with an increased voltage to the processor. We did although manage to reach 3550MHz stable with the Zalman heatsink, so let us see how WaterChill performs at that frequency. Since overclockers probably will be most intrested in the maximum cooling performance we choose to only perform the tests with all fans at full speed.
 [Editor’s note: diagram is not to scale] [Editor’s note: diagram is not to scale] |
||
Intel P4 3.2E @ 3550MHz, 1.3875 vcore. |
||
| Idle | Load | |
| Zalman 7000Cu | 49 | 69 |
| WaterChill Power CPU Kit, 3 fans @ 12V | 44 | 52 |
We can see that the increase meant more strain for the both cooling devices. This was the absolute limit for our processor with air cooling and we are getting dangerously close to the temperature limit when the processor starts to throttle. The WaterChill kit had no difficulties what so ever with this overclocking. A few quick tests showed that there was no danger in running the fans at 7 volts either.
Now we will abandon the Zalman heatsink and see how high, stable frequency we can achieve with the WaterChill kit. After some adjusting and an increased voltage to the processor we ended up with a stable frequency of 3820MHz. The following table shows how the WaterChill kit performs in this test.
 [Editor’s note: diagram is not to scale] [Editor’s note: diagram is not to scale] |
||
Intel P4 3.2E @ 3820MHz, 1.4875 vcore. |
||
| Idle | Load | |
| WaterChill Power CPU Kit | 45 | 56 |
We can see that the temperatures are a bit higher than the previous results, but still not a problem for WaterChill to cope with. 3820MHz is by all means a respectable result for water cooling. This is as mentioned with double instances of Prime which is known for its capability to really stress processors.
In our opinion, Asetek has managed to produce an impressive assembly of components
for this package. from the beginning, their sights have been set on pure performance.
With the word ’pure’ you also get the feeling of quality and design with which
Asetek has created this package. In other words, it’s not only a matter of
hard core performance as esthetics have been part of the plan since the early
stages.
Installing a water-cooling system will never be quite as easy as installing an air-cooling system, but Asetek surely has done their utmost to ensure that it goes as smoothly as possible. More or less the only adjustment needed in the case is mounting the cooler. Mounting the pump and connecting the power supply can be done completely without modifications. Another positive aspect is the convenient push-in connections which make it possible to simply cut the tubes and push them into the connections. We were curious as to how tight this solution was and tried to get the system to start leaking by bending and pulling the tubes, but we could not cause any leakage this way.
Performance-wise, the product is just right in its category, and resembles/matches other packages with CPU blocks of the WhiteWater design. The cooler is over-dimensioned in the positive sense, and will probably handle additions of both graphics and north bridge blocks without any problems. We dare even believe that this system could master a decent peltier setup.
After a few days of tinkering with Asetek’s full-blood of a water-cooling system one can summarize the package in the following way: Very good, but not perfect. What causes this package to not get a top score are a few small but still important details. Mounting the tank is something we’d gladly seen done in a different way. The tank, in other respects, has the inlet and outlet right next to each other which causes the air bubbles to not get caught in the tank, and a large part of them continue back into the system. This problem will eventually be solved on its own, but it will take longer than necessary. The pump’s noise drowns that of the fans and both 7V and 12V, and can be perceived as disturbing by some. Our pump produced some form of vibrations that were clearly noticed.
However, we have been provided with a link to Asetek’s forum which can provide explanation and tips on how to solve the issue with the pump noise level.The link to Asetek’s WaterChill FAQ with information about noisy pumps can be found here.
In general, however, we are very satisfied with the package, and the only thing one must consider as a customer is whether one is prepared to spend that much money on a water-cooling system.
The performance is present, no doubt, and so is the feeling of quality, but a price tag of almost 2500SEK for a water-cooling system is a hefty investment. Asetek Power Kit KT03-L30 is in our view for those enthusiasts who are interested in really serious cooling, but don’t feel like taking the step up to solutions based on phase change technology. For beginners there are both cheaper and less cumbersome packages, especially from Asetek themselves, that would be better suited.
But for those that have the money, we highly recommend this kit, which is one of the most powerful water-cooling packages on the market today.
Asetek WaterChill CPU Power Kit KT03A-L30  |
|
Pros: + Cooling capacity + Sturdy mounting of water block + 12V/7V option for the fans + Room for upgrades Cons: |


Leave a Reply