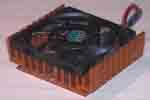
The main reason for changing the cooler of your video card is either to increase the stability or if you want to overclock it.With an overclocked video card you can gain a lot of performance with e.g. games and graphical applications.
Before you start with changing the cooler of your new video card we want to urge you to be careful and remember you that we take no responsibility for any damage and on your video card or any other hardware. But if you are careful and thorough there should be no problems.
There are many ways to approach this. We will in this article discuss how to change the cooler of an Asus Geforce V6600 and similar cards. Attaching the new cooler on the video card isn’t always easy. With glue it will be hard to remove it later if you want change it again without damaging the card’s processor (GPU), or any other parts. Cable ties isn’t a reliable solution either. We’ve chosen to use screws, which turned out to work quite good.
1 heatsink, preferrably larger than your previous
2 screws, you will have to measure the holes of your video card because it varies. Our V-6600 SDR card had 3mm holes.
2 rubber washers
First of all you have to remove the stock cooler.
Before you start working you should make sure to use antistatic wristband or something similar. This avoids any statical electricity that will damage or possibly destroy your hardware.
You remove the cooler by cutting the small plastic ends on the back, then turn the heatsink to make it loosen. The old paste can be a bit sticky but will loosen if you use the right amount of force.
Our heatsink comes from Clas Ohlson.
The HSF (HeatSink & Fan) you can see on the image is the new cooler. There haven’t been many options when it comes to heatsinks for video cards until lately as some very interesting models have arrived. Blue Orb from Thermaltake has been around for a while now and it is a possible option here. This cooler cost us only $9.99 and therefore was our choice since it was such high value.
With most video cards there are two holes on each side of the GPU, we will take a closer look at these when it is time to drill. Put the new cooler up-side-down, then put the video card on top of the cooler so that the heatsink ends up right above the GPU. Then mark where the drill holes through the holes in the video card. Now that the holes are marked it is time to drill. The holes in our video cards was 3mm in diameter and we drilled with a 3mm drill in the heatsink where the marks where.
This heatsink was pretty soft so we didn’t have to expand the hole but just screw the screws through.
To make the heatsink sit firmly against the GPU it is important to use cooling paste. Make sure to cover the entire GPU with a very thin layer of paste. Now thread the screws through the rubber wafers, through the card, new wafers and finally the heatsink. Make sure the screws only touches the wafer and not the card, otherwise you risk a short circuit!
Now we only have a few things left. If you want to see the RPM with e.g. SmartDoctor that comes with Asus’ cards, you have to cut the wire of the new fan and attach it to the old connector found on the cooler and then connect it to the card. Not at all hard to do, red to red and black to black. Now it is time to plug in the card and take it for a run.
With the stock fan we managed to reach 140 /180 MHZ (default 120/166 MHz) but the heatsink got very warm, ~60°C and was not 100% stable. With the stock heatsink and default clocks the temperature was about 47°C. When we installed the new heatsink the temperature went down with 8 degrees to 39°C. With the new heatsink we also got the opportunity to overclock a lot more. We managed to reach 160/200, and did so for a number of days 100% stable. Then we tested if we could go any further but alas no. Around 165/200 we saw some artifacts so we settled for 160/200. The temperature was about 44 degrees idle and after a few hours of Quake it rose to about 49 – 50 degrees.
| Quake 3 Arena timedemo |
Below is a table over the frames per second with Quake 3 Arena
Our test system:
AMD Athlon 700Mhz
Apacer 128Mb 133Mhz CAS 2-2-2
Asus V-6600 GeForce SDR 32Mb
IBM Deskstar 20.5Gb 7200rpm
D-Link DFE-530TX
50x CD-player
We tested with a number of drivers and concluded that Detonator 5.22 worked best.
|
Stock 120/166, 16bit
|
Stock 120/166, 32bit
|
|
|
1024*768
|
69.9 FPS
|
45.4 FPS
|
|
800*600
|
85.5 FPS
|
70.0 FPS
|
|
640*480
|
89.4 FPS
|
84.7 FPS
|
|
Overclocked 160/200, 16bit
|
Overclocked 160/200, 32bit
|
|
|
1024*768
|
78.5 FPS
|
54.7 FPS
|
|
800*600
|
87.9 FPS
|
76.3 FPS
|
|
640*480
|
89.8 FPS
|
87.3 FPS
|
|
Increase 16bit
|
Increase 32bit
|
|
|
1024*768
|
8.6
|
9.3
|
|
800*600
|
2.4
|
6.3
|
|
640*480
|
0.4
|
2.6
|
As you can see there is almost no FPS increase with 640*480 16bit, but with 1024*768 both in 16- and 32bit we had an increase of 8.6 FPS and 9.3
This was well spent $9.99, no doubt there. There are other, more appealing coolers, but the performance doesn’t always match the look.
This one isn’t beautiful, but it will do. The only con is that it was a lot of work drilling the holes, which wasn’t solid, but had two ears you had to drill through. Otherwise things went very well and the final result was a real gain in performance that didn’t cost much.
Good luck!
This was the final result.


