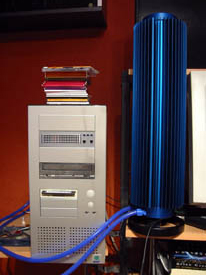
Today we are going to put a highly interesting product in focus: the fanless water cooling from Zalman. Zalman is a brand well known for their silent products, and they have even introduced CNPS (Computer Noise Prevention System), which contain a whole series of products. Earlier we had a preview of their passive case, and now it is time for the next item; the fanless water cooling. Some label this as passive, however it is not as there is an active pump that circulates the water in the system.
Today we are going to put a highly interesting product in focus: the fanless water cooling from Zalman. Zalman is a brand well known for their silent products, and they have even introduced CNPS (Computer Noise Prevention System), which contain a whole series of products. Earlier we had a preview of their passive case, and now it is time for the next item; the fanless water cooling. Some label this as passive, however it is not as there is an active pump that circulates the water in the system.
Anyway, the noise level should be very low, at least if Zalman has equipped the unit with a silent pump. I suspect that this product will start a trend and that there will be many more fanless water cooling systems on the market within the next months.
Zalman’s strength is in the newly developed reserator, which is optimized for fanless use and therefore should work excellent. However, the question is if it can handle the power stress that a modern processor can generate. This is one of the things we will find out in this review.
|
Specifications: Zalman Reserator 1
|
|
|
Specifications
|
|
| Material |
Aluminium basis and a plastic foot
|
| Nipple size |
13x10mm or 12x8mm
|
| Weight |
6.5 Kg
|
| Dimensions (LxWxH) |
150x150x592
|
| Liquid capacity |
2.5
|
| Power (pump) |
5W
|
| Max difference of height (pump) |
0.5 m
|
| Flow (pump) |
300 l/h
|
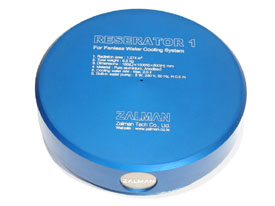
The external part of the water cooling, or the reserator as Zalman calls it, is the unique part of this construction. “Reserator” is made up term for the two functions in the unit, which is the reservoir and the radiator. It is simply a 60 cm high, cylindrical, hollow tower made of blue anodized aluminium. At the bottom of the reserator you find the water pump that circulates the water in the system. The pump has a maximum flow at 300 l/h and according to the specifications it needs about 5 W. The choice to not use a standard radiator will hopefully be a winning argument, as this one is suited for fanless use.
| Design |
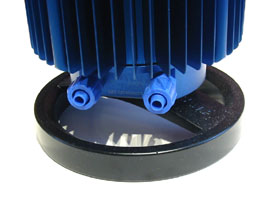
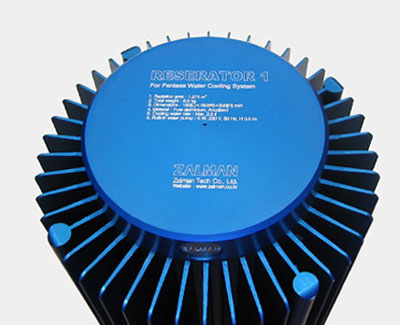
As the unit is supposed to work as a radiator and remove all the heat from the water coil the tower is equipped with long fins that drastically increase the contact surface with the air, and to work as good as possible with the natural movements of air they are mounted vertically. The only thing cooling the unit is the air convection, a phenomenon you can read more about in the article about air cooling here on Nordic Hardware. In brief you can say that the system make use of hot air that ascends, which creates a turbulence around the unit that works as a big heat sink. The total contact surface against the air is 1,274 m2, which is surprisingly much when you see how small it is.
The unit has a pure style and the blue colour makes it quite pleasant to look at compared to radiators that, to be honest, are not very hot. The hose connections are placed at the bottom, these are blue coloured as well and are threaded, which make them stick better than with an ordinary hose clamp. The unit itself is mounted on a black base, made out of some kind of hard plastic. At the bottom the pump cord is attached, and it is plugged directly into the wall socket and is switched on and off by the switch mounted on the cord.
The reserator consists out of three main parts: the top, the bottom and the middle. As it is Zalman that has constructed the complete package the pieces are screwed together instead of riveted or welded, in other words it is easy to dismount it if you like. The top part is the least advanced, it is simply a threaded lid made of blue anodized aluminium that is tightened on the middle. On top it has a white print telling a few specifications and a Zalman logotype.
If you remove the lid and take a look inside you will find a quite Spartan view, as the interior is completely cylindrical. The question is if the large surface is enough to keep the water and resistor at the same temperature or if a grooved inside would result in lower water temperatures. At the bottom we see the tiny pump that Zalman has chosen to equip their system with, and it does certainly not look like it is going to make great achievements, but that remains to see.
|
Specifications: Zalman ZM-WB2
 |
|
|
Specification
|
|
| Material |
Gold plated copperbase, aluminum cover
|
| Inner construction |
3D-Channels
|
| Connection size |
13x10mm el. 12x8mm
|
| Weight |
446 grams
|
| Mounting Socket A |
Uses the four holes
|
| Mounting Socket 478 |
Snapclips for the heatsink
|
| Mounting Socket 754/940 |
Screwplate for the mainboard’s holes
|
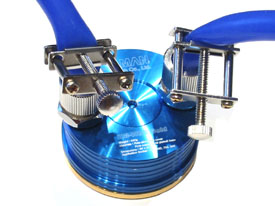
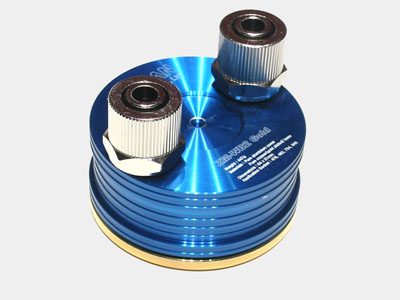
Of course you get a waterblock for the system, and what a surprise: it’s Zalman’s own creation. The waterblock has the article id: ZM-WB2 and is version number two of their waterblock. According to specifications the waterblock has a goldplated copperbase for optimal transferring of the heat, the truth is though that a silver would have been better since it has a higher heat conductivity. When you buy the waterblock separate you get several different sizes of the tube connections, this is not the case here though since you only get the size that fits the reserator. Note that it is not only the inner dimensions that has to be of a certain size, the outer dimensions has to be correct as well to make it possible to fasten it properly.
The support for different sockets is good, the waterblock can be mounted on Socket 478, Socket A, socket 754 and Socket 940 with the help of some extra dealies that comes along with the package. The block weighs in at 447 gram which is a bit above what a regular cooler weighs, Zalman has therefore put in a small note that tells you to be careful when moving the computer to avoid any damage to mainboard/processor. You also get a small note with extremely small letters that says how to mount the block on all sockets. You also get a rather minimal tube of coolingpaste that probably only is enough for 2-3 mountings if you are a bit cheap when applying.
| Design |
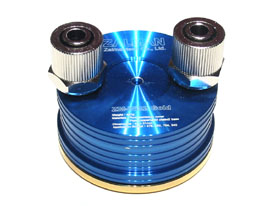
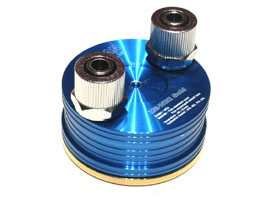
The waterblock’s outside is pretty similar to the one we saw on the reserator, but less dimensions and less spiky. The block itself consists out of a blue anodized aluminum in the same color as the reserator. It has also white printing on the top, whether this is neat or not I will let you decide. Except a Zalman-logo and model id it tells you weight, dimensions, material and what sockets the waterblock fits on.
On the top of the block is also the tube connections, and these look in my opinion a bit to thick and clumsy. They are, just as the reserator’s, of screw-model which means you screw the hose on instead of just threading it on. The side of the block has been proofed with a small O-ring made of black rubber.
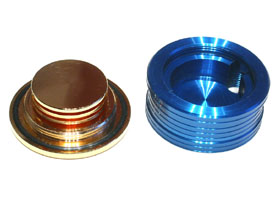
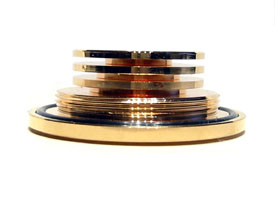
The bottom is as I said before made out of pure gold plated copper, you can’t see much of it though when the block is set to place. Zalman has chosen to combine copper and aluminum in the block which can cause corrosion, fortunately they have solved this by plate the aluminum which reduces the risk of that happening significantly. The inside is interesting since they use a design rather similar to the one aquacomputer uses in their Cuplex evo.
The idea itself is that you force the water to travel in paths which are “stacked” vertically. By letting the water have a big contact area against the copper which in turn has contact with the core it should make the temperatures go down, but that is what we will find out later in the review. With the waterblock is a small note where it says that you should tighten the block and connections before mounting to see that it doesn’t leak anywhere. I didn’t have to do this, both parts that the block consist out of was screwed together with great force, I even had to take out the polygrip and the vice to be able to separate them and take some pictures.
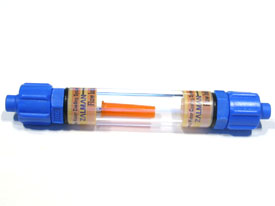
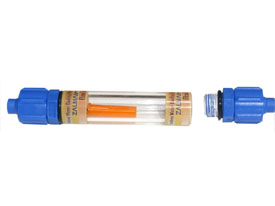
Zalman have sent us a nice little accessory package with some really smart solutions. The first thing I noticed was the flow indicator. A problem with watercooling is that if the waterpump would stop working the system would gradually get hotter and ultimately passing the critical temperature limit of the processor, and if you don’t have any automatic protection the following things could get nasty. With the help of a flow indicator you can decrease that risk, since it only takes a quick peek at it to see if the water is circulating or not. The flow indicator is basically a transparent plastic cylinder with a little fastened float in it. If the water is flowing, the plastic piece will run around in there like it’s possessed, and if the water isn’t, it will stay still. Simple, yet effective. The problem though is that it doesn’t warn you in any way. You have to keep an eye on it.
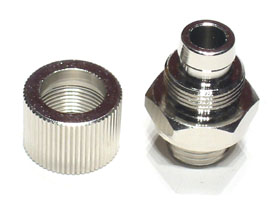
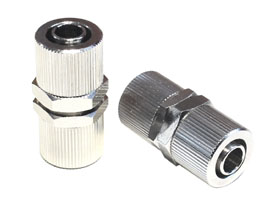
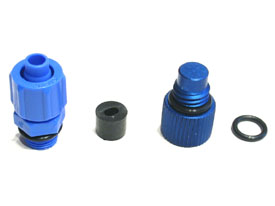
If we take a deeper look into the box of toys we find a bag containing the transition connections for example, used between the computer and the hoses on the outside. Here Zalman has done a big mistake, the hose connectors are to be used at a PCI-backplate but they haven’t sent one with the package with pre-drilled holes. That means you have to take out a backplate from your computer and then drill in these. This conveys air and dust to be easily sucked into the hole that has been made, and it’s not very pretty either. In the bag we also find reserve parts and a screw used to plug the hole should you choose to screw the integrated waterpump out to connect an external.
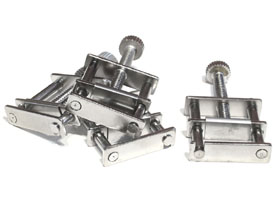
We’re not out of accessories yet, since Zalman sends us four very smart hose clamps used for moving the system and such. These make sure the water doesn’t pour out. A genius yet simple construction worth an applause. Everyone that deals with water cooling knows how tiring it is to switch blocks for example, since you have to drain the entire system. By clamping the hoses just before the block leaks water into the last piece of hose. A very smart and subtle solution by Zalman! This makes it much easier to move the unit. Two on the inside of the case and two on the outside keeps the water in the hoses.
The hosing shipped with the package is of surprisingly high quality. I had expected some kind of stiff PVC-tube, but was I wrong! In the package there’s about 2.5 meter high quality silicone hosing. It’s a delight to work with, since it doesn’t bend if you don’t want it to and it has a surprisingly small bending ratio which makes it easy to haul the hosing inside of the box. In true Zalman-spirit the hose is blue, and a closer peek reveals that the hose is completely blue and not just on the surface. The soft silicone hose makes the other hosing connectors to work very nice. With a PVC-hose there’s a risk that you can’t fasten the screwing part orderly.
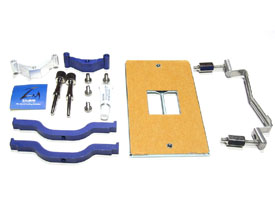
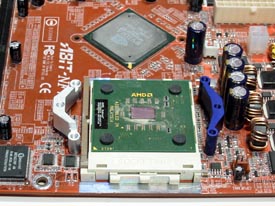
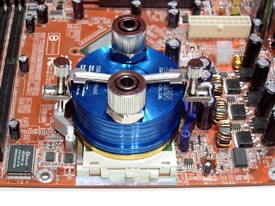
After small review of the accessory package I thought it would be child’s play to install the system, but I encountered bigger problems twice. We will walk you through this in chronological order, the first step is of course to remove the motherboard, remove the old cooler and clean the processor. Then it’s time to mount the water block, but there’s a big difference in the installation between the different sockets. Since I only own a Socket A-system it felt natural to mount the water block this way. The first step is to screw two small metal pieces into the four holes around the socket, where the thinner one of these is very tightly fastened. I almost didn’t succeed in installing this, so this is a potential compatibility problem.
The way to fasten it is also weird. No rubber bricks of any kind, which means that this is a direct connection between metal and the motherboard. Since the water block weighs a lot it feels a bit risky, but luckily I managed to do this without breaking my motherboard. After these two metal bricks are in place the parts are put in their places, and a metal piece is fastened over the water block. This is then screwed on using some kind of long thumbscrews. Personally I think the pressure was a little bad but it can also be my imagination playing tricks. The block rotates freely under its axle until a hosing connection is attached at the middle piece, but it feels, as I sad earlier, that pressure onto the processor is a bit to low.
Now it’s time for another important component in the system, namely the hose. Without this it’ll be very hard for the water to get anywhere. Cordless water cooling isn’t invented yet as far as I know. The first step is to cut the hose into two parts at similar length and a little extra part to use between the flow indicator and the reserator. Here I stumbled on a big mistake where I was screwing some of the hose connection apart to fasten the hose, the entire connection came off with the hose and all of the water tightening material fell to the floor. Of course it’s pretty easily fixed, but it’s not very funny when you think that everything should have a high standard.
After all the hosing has been mounted the fun part begins, to get approximately 2 litres of water and pour a litre into the reserator. Then you turn on the water pump and ponder if it’s on or not. You need to put your ear close to it to hear it. After the system is filled with water the rest of the water is poured into it and the lid is screwed on top. Remember to always check for leaks for at least 24 hours after the system has been installed! Now you can either do like normal people and enjoy the silence, or do as I did and bring the unit to its knees by testing it, and putting up the results on the next page.
|
Test system
|
|
|
Hardware
|
|
| Processor: |
AMD Athlon XP1700+
|
| Cooling: |
Zalman Reserator 1 |
| Mainboard: |
Abit NF7-S 2.0
|
| Memory: |
2x256MB Corsair TWINX512-3700 DDR-SDRAM
|
| Graphics card : |
Sapphire Radeon 9800PRO
|
| HDD: |
3x120GB Western Digital 120GB
|
| PSU: |
Antec TrueControl 550W
|
|
Software
|
|
|
Temperature reading:
|
MotherBoard Monitor 5.2.2.0
|
| Operating system: |
Windows XP Professional (Service Pack 1)
|
Here we had to bring some new definitions into the game when it comes to Load and Idle, since the amount of water is plenty and the reserator consists out of a lot of material it will take quite some time for the system to get its right temperature. To really make sure, the Load-temperatures are measured after 10 hours full load and the Idle-temperatures after 10 hours without load. The temperature of the room is kept within a margin of 0.5 degrees Celsius during the test. I was thinking of testing the system with other blocks, but I didn’t have any that fit the hoses. My on-die-reader is broken as well, so we are back to good ol’ socket-temperatures.
As reference cooling I have DangerDen RBX together with a Eheim 1048 and a really large radiator. Besides, I tested the temperatures of the Zalman-cooler while there was a fan blowing at the reserator, and in that way really be sure how efficient it really is. Enough with the talking here comes the results.
| Test results |
We tested the CPU-cooling with two different settings, one average overclocked and one highly overclocked. To run it in stock speed didn’t feel very interesting since it is watercooling we are talking about. This first setting with processor at 2000MHz with a vcore of 1.75V, and to get a high power utilization we also tested with 2400MHz and a vcore of 2.0V. The temperature marked with reserator is the temperature that the reserator had when we had reached the temperature and is thus no waterblock or something similar.
| Temperatures above room temperature 1700+ @ 2000MHz, 1.75V |
||||||||||||||||||||||||||||||||||||||||||||
|
||||||||||||||||||||||||||||||||||||||||||||
|
||||||||||||||||||||||||||||||||||||||||||||
| Temperatures above room temperature 1700+ @ 2400MHz, 2.0V |
||||||||||||||||||||||||||||||||||||||||||||
|
||||||||||||||||||||||||||||||||||||||||||||
|
||||||||||||||||||||||||||||||||||||||||||||
I think the the test results are just excellent. Sure, they are a bit above the ones we got with the RBX-system, but that doesn’t mean that the system is bad in any way. Since the system is more or less completely quiet 8-9 degrees Celsius above a top-notch-watercooling that gives respect. When the power utilization goes up it is noticeable that the reserator has trouble keeping the temperatures at a descent level, but it still works without any considerable misfortunes. The reserator has a descent increase in temperature, but when the utilization goes you can really notice how it has to work.
| Noise |
Here comes the best part when it comes to the cooling, namely the noise. As you might have noticed that is the whole point with this product, to be quiet and still perform rather good, the performance there was nothing wrong with and the level of noise is ridiculously low. The only thing that could be making any sound at all is the pump, but even that is completely silent. You have to lay your ear against the reserator and feel the vibrations to be able to hear if the pump is on or not, you can’t practically hear it otherwise. This is because of that Zalman has chosen a very quiet pump, but also that it is being hushed by a big aluminum pipe. I can’t do anything but congratulate Zalman when it comes to the level of noise, it doesn’t get any quieter then this.
For once it feels easy to write this part, it was long since something impressed me this much. Zalman has taken the step into the fanless water cooling with all its problems perfectly. With a special designed reserator which is passive, it is not much of a wonder, but the product doesn’t have the “baby diseases” revolutionary products usually have (with one exception, the poor quality of the flow meter and the bad tube link out of the computer). The included tube clips are a very good designed and they are excellent.
|
Zalman Reserator 1
 |
|
|
Pros: |
The system is completely quiet and it performs a little bit worse than a regular water cooling system, but it definitely lies in parity with better air coolings with loud whining fans. One disadvantage is of course the space it takes; the reserator is anything else then small. However for me it doesn’t do a thing to show it up beside the computer, a stylistically pure outside just enhances the computers look. When it comes to the performance it lies in parity with the best air coolings and between 5-10 degrees after the best water coolings available.
I strongly recommend this product to all of you who want to make your computer a bit more silent, without loosing too much performance. Zalman will also launch a water block for the graphics card but unfortunately we weren’t able to test it in this review. I am so happy with this product that I will give it the reward “The Editors Choice”. Even with its few disadvantages, all advantages makes up for it and it’s really not every day a new concept work this good. Thumbs up to Zalman!

Zalman Reserator 1


