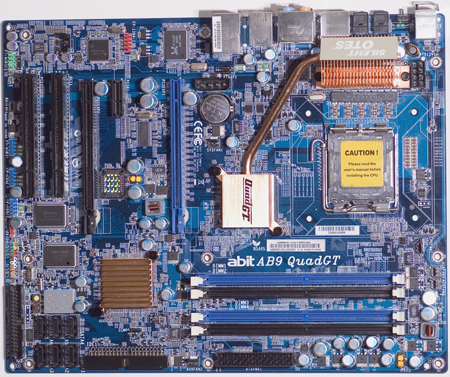
ABIT AB9 QuadGT is abit’s latest board based on Intel’s 965P chipset. We take it for a spin and investigate if the board can handle some rough overclocking.
As you know Intel is at the moment the rulers of the computer performance scene with its Core 2 duo/Quad-series, and never before have we seen such a CPU development from one manufacturer. Quad Core CPUs already exists and soon the first 1333MHz FSB-CPUs will be in stores, DDR3 will be arriving this summer and 45nm will be used when manufacturing. In other words, it’s a colossal development rate which requires a lot from motherboard manufacturers.
Certainly, no consumer became particularly nonplussed over the Core 2-series launch late summer, but motherboard manufacturers have had a hard time keeping up, especially the smaller manufacturers that don’t have lots of money to spend on R’n’D.
Abit released its first version of the AB9 at the launch of the P965-chipset, the AB9 and the AB9 PRO. These had various kinds of problems that seemed to suffer quite hard from the JMicron S-ATA-controller which doesn’t let anything work. The memory compatibility was also a problem. All of this should however have been solved by the new BIOS version 15.
A lot has happened since then, Abit has manufactured lots of high performance and exiting motherboards, like the IN9-32x MAX based on NVIDIA 680i, the mATX IP-95 that is supposed to work well with overclocking and last but not least a new addition to the AB9-series, namely the AB9 QuadGT. With support for, among other thing, CrossFire, HDMI from the integrated sound card and a few other innovations this is one exciting card. We intend to sort out exactly how good this card is, using once again overclocking.
|
abit AB9 QuadGT
|
|
| Processor support | Intel Core 2 Duo/Quadro/Pentium D 1066/800MHz FSB |
| Chipset | Intel P965/ICH8R |
| Memory | 4×240-pin DIMM sockets, max. 8GB, Dual Channel DDR2 800/667/533MHz Un-buffered Non-ECC |
| Expansion slot | 1x PCI-E x16 1xPCI-E x16 (x4 bandwidth) 1x PCI-E x1 2x PCI |
| Storage | 6x SATA 3Gb/s via Intel ICH8R (AHCI & RAID0/1/5/10) 2x eSATA 3Gb/s via JMicron JMB363 (RAID0/1/JBOD) 1x Floppy 1x IDE connector |
| Internal connections | 6x USB 2x IEEE1394 1x HDMI (S/PDIF) header 1x FP-audio |
| External connections | 1x PS/2 mouse 1x PS/2 keyboard 1x S/PDIF in 1x S/PDIF out 2x eSATA 4x USB 2.0 1x RJ-45 (10/100/1000Mb) 1x Clear CMOS Switch |
| Size | 305x245mm |
| Price | $180 |
Excitingly enough there is a HDMI connector for S/PDIF sound that is to be connected to the video card using HDMI, a feature the R600 from AMD supports, something that can be used if you have a home theatre system or similar you want to connect your computer to. A cable isn’t enclosed.
Two eSATA connectors are available on a back panel for those who use such.
From an overclocking point-of-view, the CCMOS switch on the back, which lets you reset CMOS after e.g. a failed overclocking, is the most exiting. A good feature, but perhaps not as revolutionary as Abit try to make it appear. This has been used in SFF computers for a while and with the DFI LP OUT ICFX3200T2R/G you don’t even have to get up from your chair, because all it takes is to push down Power + Reset for four seconds. It’s nevertheless a welcomed feature.
Abit has lately been utilizing darker colors on their boards lately, and this is no exception. The motherboard in its entirety is in a dark blue shade with heatsinks and heatpipes in copper. The coloring is quite simple, especially if you compare it to the prevuisouly reviewed Gigabyte GA-965P-DS3. The only slots that aren’t black are the two of the memory slots, which only contributes to a uniform feeling.
 |
 |
All connectors are carefully placed along the edges of the board with the IDE connector in a 90 degree tilt, but not the FDD connector. Furthermore, we’ve got Power and Reset buttons on the board, something which is always appreciated. Either way, we’re looking at two PCI-E x1 connectors between the two bigger PCI-E x16 connectors and should you be running two graphics cards with dual slot cooling you might as well kiss a PCI-E x1 and a PCI connector goodbye, leaving one PCI-E x1 and one PCI connector effectively.
 |
 |
Around the socket we have ourselves a nice clean space with the Silent OTES heatsink as the potentially biggest problem in sight, as it in some rare very extreme cases might be located too close to the socket. Also, we have a capacitor whose position is a bit weird, but this was no problem. More of a fun thing really, as we have one single capacitor around the socket. This was no issue during our testing with the coolers used either.
If we let ourselves take a closer look at the Silent OTES cooling, its main feature seems to be dissipating heat from the heatpipe originating from the small northbridge heatsink. Luckily, one might say, as the small northbridge cooler wouldn’t manage this by itself, as it would have been ridiculously small without the heatpipe and on top of that, it’s also made of aluminum. This isn’t much of a turn-on though, even though what’s beneath the bigger heatsink where the heatpipe ends up just might turn you on, at least a little bit. Here lies a five-phase digital PWM, and that’s the reason for the lack of regulators around the socket.
 |
 |
Should you decide to take a tour for conventional voltage regulators, you actually find one, should you look close. This is not located by the CPU socket, but by the DIMM sockets. This is also where all capacitors (except one) have ended up on the top half of the board, as they clearly weren’t welcome around the CPU socket.
At a first glance, the BIOS looks like just any other regular Award BIOS, which is a good thing. One thing differs this from the original AB9 boards though, and that is the background color, the QuadGT has a regular blue one instead of the pink one that our own Crotale so dearly loves, as expressed during DreamHack. It doesn’t feel as unique, but to be honest, it’s much nicer to look at a blue background compared to a pink one.
 |
 |
The cursor rests handily on the µGuru Utility, enabling you to simply press Enter to access overclocking options. When pressing Enter, this menu reveals itself.
This is after loading “Optimized Defaults” and Abit “optimizes” your settings by overclocking by 6MHz FSB. Whether this is on purpose or not, we don’t know, and we won’t look any further into it either.
Having a look at the FSB setting options, we see a span between 133 and 600MHz, and this is called External Clock in BIOS. Hopefully, this board goes all the way to 600MHz, but that remains to be seen until the overclocking tests.
 |
 |
Further on, we have N/B CPU Strap As, which is a divider for the northbridge which sets your northbridge frequency, in short. Available settings are “By CPU”, PSB1066, PSB533 and PSB800, in other words nothing new really; things are just as they should.
Below N/B Strap we have the memory divider, DRAM Spec. Settings ranging from “By SPD” (4:5), DDR2 533, DDR2 667 to DDR2 800. No formal support for DDR2 1066, but at the same time not many users will be using their CPU at standard frequencies whilst running their memory at 1GHz+.
 |
 |
Lastly, as far as the frequency tuning goes, we have the PCI Express frequency, adjustable between 100 and 200MHz. Higher frequencies on these ports gives you increased bandwidth between the ports, which might improve your performance in software Crossfire for instance. Otherwise, there would be very little for you to gain by tampering with this setting.
Below the PCI-Express frequency setting we have a very interesting section in form of the voltage adjustments, Voltages Control.
On top of this page, CPU Core Voltage is located, of course a very important setting. Lowest available setting is 1.25, maximum 1.85V, in 0.01V increments. Very fine tuning available in other words, at least as far as the CPU voltages are concerned, although the lowest available setting isn’t exactly optimized for HTPCs with passive cooling. But then again, surely noone would buy a card meant mainly for overclocking, and put in their HTPC?
Of course there are lots of other voltages to be set, such as VDimm, called DDR2 Voltage in BIOS. This is settable between 1.8 and 3.0V, with very fine 0.025V increments. This by itself is worth a lot of praise, and something we really welcome.
 |
 |
Next up is the CPU VTT 1.2V Voltage, which ought to be VFSB rewritten. Settings ranging from 1.2 to 1.5V with 0.1V increments, and the standard voltage is exactly what the name suggests; 1.2V. The increments might be a bit too harsh, at least compared to the other voltages, but on the other hand this may not be the voltage that benefits from extreme fine-tuning.
 |
 |
Then we have the MCH 1.25V Voltage, the northbridge voltage in other words. The name once again suggests the original voltage, 1.25V. Abit impresses largely by letting users set their voltages up to 1.7V, which should be enough to make the heatpipe arrangement on the northbridge to overheat and burn the chipset itself. Generous nevertheless, as this might come in handy with other cooling than the standard one. The 0.05V increments are also good to see.
Of course the southbridge voltage, the ICH 1.05V Voltage, is settable. Probably not values that make nuclear plants go Chernobyl, but up to 1.2V ought to be enough for pretty much everything. This paired with the 0.05V intervals between 1.05 and 1.2V makes for some reasonable settings.
 |
 |
Lastly, we have yet another setting affecting the RAM, namely DDR2 Reference Voltage, which can be set to 0% (standard), +2%, -2% and -4%. This is fine-tuning at its best, if you feel like the 0.025V increments doesn’t do it for you.
Sadly the memory settings aren’t located in the µGuru menu, but instead are located in the Advanced Chipset Features. Nothing that causes you headache, but still a bit sad, since it would be great to have everything gathered at one place. The settings available doesn’t exactly impress either with tCL, tRCD, tRP, tRAS, Command Rate and tRFC as the “only” available ones. Bearing all the great voltage settings in mind, we were hoping for some mad options as for the timings, but sadly we were wrong. Nothing that can’t be fixed via software in Windows, but a few extra timings in BIOS would have most certainly been preferable.
 |
So, to sum this BIOS up? It’s a very competent one, if a BIOS could be called that. There are enough voltage adjustments for almost everyone and of course the extras we didn’t bring up here, such as fan controlling on all connectors with settable voltages on these as well. This is paired with a pretty complex system of temperature control, which you also can set in µGuru, why we leave it for the µGuru tour.
Features isn’t the thing this board is lacking, Abit has even added LEDs to the back side of the board (strong ones too) and thankfully you can turn them off in BIOS, or alternate their blinking pattern. Further on, we have great a temperature monitoring page with CPU temperature, system temperature, temperature on all PWM phases as well as average and maximum current in PWM. Also, you can set a shut down temperature for each one of these, where of course the whole computer shuts down, preventing damage to your system.
As if that wasn’t enough, many motherboard manufacturers realize that the year is 2007, why they incorporate overclocking profiles in BIOS, and the AB9 QuadGT has five of these for saving your settings.
In other words, we would go as far as gunning this BIOS for the best one there is, with few exceptions. The first one isn’t that serious, it’s the boring background color in the µGuru menu, the grey one. The second one is a bit more serious, especially as there are settings for everything thinkable and unthinkable, with the ability to monitor the currents in the PWM that stands out the most. With these features in mind, we wonder the following: why not more timings? It’s not like the BIOS is ruined because of this, but it would be greatly appreciated by many enthusiasts.
Abit has developed its own overclocking program for Windows ever since the days of Socket A and this was called µGuru. In practice, it’s about being able to change voltages and do overclocking right from Windows, even if there were lots of problems with it. µGuru was introduced with Abit’s AN7 a lot of years ago, and loads have happened since that. Nowadays you can’t really accuse µGuru of being anything bad except for its looks, which could be its biggest disadvantage.
This is purely subjective, but the fact is that there aren’t really many overclocking programs from manufacturers that are clean and nice to look at, like CoreCenter from MSI, Easytune from Gigabyte and other totally unintelligible programs that sit neatly on the throne of drivel. At first sight, µGuru looks like another one of those programs, but on a closer look, you notice that there’s a lot more than just a shell that looked flashy in 1992.
Above you can see the three main tabs that are in the main menu; temperature monitoring, voltages and fan speeds. Abit calls this part Abit EQ, and perhaps some of our readers can remember a monitoring program from the Socket A days that went by the same name.
Then there’s the next part: OC Guru. Here we can see for how long the computer has been turned on, for how long the computer has been provided with current but being turned off at the same time, and also the voltages just like they are set in BIOS, except for VDIMM that stubbornly shows 0.1 V less than the actual value.
Last in the section of large buttons to press, there’s Fan EQ, a section that shows you just how you’ve configured the speeds that your fans are supposed to spin at.
"That’s not anything special", you might think. We agree. Things won’t happen until you’ve pressed "Setup", where all the fun features are. Take a look at these on the next page.
Now that we’ve gathered enough courage to press the Setup button, we’re met with this page with the following tabs:
Here you can configure what you want to monitor, and if you want the computer to give off sound alarms at a certain threshold or if it’s supposed to be turned off at another.
Autodrive is a feature that lets you associate profiles with various programs. Perhaps you would like your computer to be quiet when you’re watching movies? No problems, just create a profile that underclocks the computer and lowers the voltage provided to the fans and associate it to a program that you use to watch movies. Naturally, this works for overclocking as well, like EIST but with overclocking.
Moving on, we have FanEQ where the picture speaks for itself, but in short you can use it to configure temperature control for your fans with four temperatures as a reference; CPU, SYS temp, average temperature for PWM as well as max temperature for PWM. The three profiles called Turbo, Normal and Quiet are preconfigured, but as a user, you can play with User1-3 in addition to the default profile.
OC Guru. Wasn’t this what we longed for? Taste the word. Say it out loud. OC Guru. You’re the OC Guru, since the program luckily doesn’t have a will of its own. Does that make you feel great? Oh yes.
Here we are given control of every voltage and frequency that can be set in BIOS, except for memory timings. Extremely good, if we might say so ourselves. None of the settings require a system restart either, just like other “overclocking programs” for Windows that are made by manufacturers. The only thing we can imagine missing here are memory timings, but Memset does give the user everything it might need when it comes to timings.
The program is also linked to BIOS, so the things that you set in OC Guru are saved in the BIOS, which is both good and bad.
On the last tab, General, you can configure pretty regular stuff like update intervals and so on.
The best thing about this program is clearly not the looks, but the functionality. There is so much that you can play with that you’ll never have time to do anything but optimizing fan speeds, and you will probably switch between profiles most of the time just for fun.
Alright, that might have been very exaggerated, but it is a highly convenient program. Without a doubt the best that a manufacturer sends with its motherboards that we’ve ever gotten in contact with.
Let’s move on to a review of the testing system for our tests.
| Hardware | Test system |
| Motherboard | Abit AB9 QuadGT |
| Processor | Intel Core 2 Duo E6600 (L629B) |
| Memory |
Crucial PC5300 (D9GMH) |
| Graphics card | Gainward GeForce 8800GTS 320MB @ 675/975MHz |
| Harddrive | Samsung SP2504C VT100-50 |
| Power supply | OCZ Powerstream 520W |
| Software | |
| Operating system | Windows XP MCE (SP2) |
| Chipset drivers | Intel 8.1.1.1010 |
| Graphics drivers |
ForceWare 97.92 |
| Benchmarks program |
SuperPI 1.5 |
On paper the board certainly looks impressive, and since we know that the motherboard has the C2 northbridge our expectations are nothing but sky-high. On the other hand, there is no need for a 600MHz FSB here, as we will be using an E6600 with an x9 multiplier, but if you pay $180 for a motherboard you expect everything to be top notch. Or at least, be rock solid.
Rock solid is precisely what the board is, at least to begin with. On the other we have the fact that we using “Optimized Defaults” so there’s not much to argue about there. We should mention that Abit is cheating a little by setting the FSB to 272MHz instead of 266MHz, which is the default setting. Why this is we will leave to you to decide and this will not contribute to any noticeable performance gains, just a thing we noticed.

But we had no intention of stopping there, but also tried this out to have a reference. Overclocking is the main focus of the article. Said and done, we put Intel’s stock cooler to the test. Luckily there have been settings for protections against overheating for years. The cooler isn’t left completely stock though, but we upgraded the stock attachment device to long M3 screws and a Coolink fan, which moves as much air as you can hear. The connection between the heatsink and the IHS is a lot better this way.
To begin with we went up to 356MHz FSB, which resulted in about 3200MHz, but the first idea was that things were way too cool, with idle temperatures at 45-50°C according to Core Temp. One round of SuperPI was done, but just one, since this was considered way too low to be used in a serious review. I mean, it’s overclocking we’re doing here.
We moved on to 367FSB, 3303MHz, and now things were starting to happen. We ran a whole bunch of tests here. The memory divider was at 4:5, I.e. 459MHz and the timings were 4-4-4-12.
Since this was so successful we decided to venture for 3.4GHz, which should be a pretty big load for Intel’s wimpy stock cooler to handle. Usually when you overclock using just air cooling you have access to big tower heatpipe monsters like the Tuniq Tower and the Noctua NH-U12, preferably equipped with a 38mm 120mm Delta blowing the wall paper of the walls. In these cases you can expect a lot more overclocking potential than with Intel’s stock cooler. We didn’t have access to any such coolers here, but we should add that this processor has been up and close to 3.9GHz with a Noctua NH-U12 at room temperature, so we knew what the processor was capable of.
Anyhow the cooler wasn’t even stressed at 3.4GHz with 1.35V VCore, but kept at relatively low 50-55°C during idle, close to 65°C during load. Pretty OK, but nothing to get excited about. Our entire series of benchmarks passed without any problems. The FSB/Multiplier was set to 389×9, the divider set to good ol’ 4:5, which resulted in 486MHz with 4-4-4-12-latencies.
We moved on to 3.5GHz, and raised the VCore to 1.37V. The temperature escalated to about 60°C idle. We realized that this wouldn’t hold, but to our great surprise it worked fine until we reached 3DMark. It was not stable, so 3.4GHz will be the best result we will count on air, even if there probably is a golden middle road somewhere in between 3.4 and 3.5GHz, as 3.4GHz worked well with all benchmarks. We put this aside, since we have some other, sturdier cooling methods to try.
Say Hi to Asetek Vapochill LS
After isolating the board with Vaseline inside and around the socket and the rear of the board we decide to bring out the heavy artillery, namely a Vapochill LS. This should be capable to keep the processor at negative Celsius, and thus offer some more than plenty overclocking potential.
We started carefully at 450×9, no problems there. The results weren’t exactly jaw-dropping, but still nice to run a completely stable system at almost 4GHz. And we did it with a VCore at 1.65V and the other voltages had barely been touched. They had been raised a tiny bit, but we could probably have lowered one or two of them and still reach the same stability, but we didn’t want to risk anything to halt because of the voltages. There are no screenshots of this, simply because we knew that there were more to get from the board.
After one session of tests at 4.05GHz we decided to go for 4.2GHz, or more precise; 4203MHz. We needed to raise the voltage a little for the processor to cooperate, but with 1.7V set in µGuru we managed just fine. We should add that µGuru was used for the overclocking during these tests, but with reboots when changing the frequency, so that the application wouldn’t have any disadvantages of working with a computer that had been running for a while.
These settings were used during our test session at 4.2GHz:
 |
From here on we tried to skip ahead 100MHz to about 4.3GHz. We simply increased the FSB by 11MHz, without any other adjustments, everything worked great until we reached PCMark, where the application simply decided to not play along. We corrected this by raising the voltages a little, for example VCore to 1.72V, MCH to 1.45V, VTT to 1.5V and even the ICH voltage was raised to eliminate any possible sources of errors. The voltages required for everything but PCMark to pass are shown below.
 |
A somewhat exciting phenomena, since, according to us, even heavier workloads passed without any hints of problems, but with the below mentioned voltages everything worked out fine and if we would’ve felt like gaming it would’ve worked just fine.
We weren’t sure if we could push the processor even further, but still decided to test 489×9, 4401MHz, and alas it seemed we were right. Although, Cinebench, SuperPI, Winrar and the Everest benchmarks passed, but when it was time for Futuremark’s 3DMark series things ended abruptly.
 |
We got a little cocky and decided to venture for 4.5GHz, 500×9. This turned out to be far from stable, but we did managed to finish one round of SuperPI 1M, and decided to find out what was the best time we could achieve, just for fun, and check where the processor simply didn’t want to play anymore. VCore was set to 1.78V, as SuperPI wasn’t completely stable at 1.75V north of 4.5GHz. This introduced some exciting phenomena like positive Celsius, despite an evaporator temperature at -28 6°C, possibly because a not optimal mounting of the evaporator, perhaps because the heat dissipation is quite horrible at close to 1.8V.
Anyway, we managed to push our E6600 L629B to 507×9 SuperPI 1M stable, even if this can hardly be called stable, but which lead to a relatively satisfying figure, 4563MHz.
 |
After reaching the potential of our processor we felt quite pleased with the potential of the motherboard, even if we weren’t completely finished evaluating it. We still have one final check to perform, namely maximal FSB.
Being realists we decided to lower the multiplier from x9, but through a quick visit in the BIOS we have a motherboard running perfectly stable at 515MHz FSB. This is about as far as we can go. 520MHz FSB isn’t stable for many seconds, but can be set. Between 515 and 520MHz things are a bit half and half, so we’ve decided that 515MHz FSB is the highest we can get. Approved, but considering this is the C2 revision we were expecting a bit more.
In short, a motherboard with more than plenty of overclocking potential of you have a processor with a high multiplier, or simply doesn’t have to reach 4GHz with an E6300.
|
Session
|
Processor freq.
|
Bus freq.
|
Memory divider
|
Memory freq.
|
Latencies
|
| optimized defaults |
2448MHz
|
272×9
|
4:5
|
340MHz
|
5-5-5-15
|
| oc#1 |
3303MHz
|
367×9
|
4:5
|
459MHz
|
4-4-4-12
|
| oc#2 |
3402MHz
|
378×9
|
4:5
|
473MHz
|
4-4-4-12
|
| oc#3 |
3501MHz
|
389×9
|
4:5
|
486MHz
|
4-4-4-12
|
| vapo#1 |
4050MHz
|
450×9
|
1:1
|
450MHz
|
4-4-4-12
|
| vapo#2 |
4203MHz
|
467×9
|
1:1
|
467MHz
|
4-4-4-12
|
| vapo#3 |
4302MHz
|
478×9
|
1:1
|
478MHz
|
4-4-4-12
|
| vapo#4 |
4401MHz
|
489×9
|
1:1
|
489MHz
|
4-4-4-12
|
You’re most likely wondering where all of the tests have gone abd wgt there have been so much show and no go. The answer will come on the following pages. We’ve simply chosen to find the frequencies first and then run a complete series of tests.
We’ve used 4-4-4-12 latencies in all tests, the overclocking on air was performed using a 4:5 divider, while the phase change overclocking used the 1:1 divider to make sure the bandwidth was approximately the same, and because the memories would most likely not like running at 600MHz SDR.
The first of our benchmarks is Cinebench, an application mainly for testing the CPU, but not limited by the bandwidth.
Here we can see how the results scale, and then how the program mainly needs raw processor power, which is clearly seen in the difference between the frequencies.
SuperPI 1M is the next benchmark, an applications that is both CPU and bandwidth reliant.
The results are as expected, no surprises.
Winrar is the exact opposite of Cinebench, the only thing that matter is the bandwidth.
We can see that the CPU performance doesn’t matter significantly, with only 6kB/s separating 4.05GHz and 3.5GHz. We will find out the read speeds of the RAM next, as we will run some Everest Ultimate Edition 2006 benchmarks; the Mem Read and Mem Latency benchmarks. Thus the read speed of the memory, and the latencies.
We see that the memory is in fact even fast at 3.5GHz with a 4:5 divider, which results in a 486MHz SDR frequency, when compared to 1:1 at 450×9. The difference isn’t big though, but it could explain why it’s so even between the two in Winrar.
Let’s check the latencies, access time.
Here we can see some very interseting results. Already at 3.3GHz (459MHz mem.) we have an access time at below 50ns, which shows how well the divider works, as we can get below 50ns before 478MHz when running 1:1. Although, we haven’t tested any frequencies between 467 and 478MHz, but the 4:5 dividerresults in “just” 459MHz, and already we’re below 50ns. The latencies used were 4-4-4-12.
We moved on to Futuremark’s tests in the form of 3DMark 05, 3DMark 06, 3DMark2001SE and PCMark 05, all of them are most likely known to all of you. All tests were run in order and our highest clocks with respective cooling , 3.5GHz on air and 4.4GHz under the Vapochill didn’t make it through 3DMark 05, which why they aren’t included in the following tests. But we kept them for comparison in the previous tests.
All 3D tests are performed without any optimizations in the form of LOD or such.
3DMark 05 offers no real surprise, small steps between the different frequencies using the same cooling. Excluding the stock frequencies of course, these are just for reference, but they really show how much you have to gain from overclocking.
The same thing happens in 3DMark 06, but the differences are smaller. First of all because there is a tremendous load on the processor with this application, but we can still see a big difference of 1,000 points between for example 3.4 and 4.05GHz.
3DMark2001 is a lot less demanding when it comes to the graphics card. it’s only the last test; Nature, that offers any kind of resistence. That’s why see such dramatic improvements when raising the frequency, even though our relatively small 100MHz increments doesn’t add all that much. If we consider the major steps, for example from Optimized Defaults to 3.3GHz we can see an improvement of close to 12,000 points. An equal improvement when moving from 3.3GHz to 4.3GHz.
Last but not least we have PCMark05, which will simulate regular computer usage . Whether this is correct or not is up to you to decide, but it still a good benchmarking application, which why we use it.
No real surprises here either, the only thing being that 4.2 GHz is actually performing worse than 4.05 GHz, but this could be a coincidence as none of the previous tests have shown any such tendency. The tests were only run once, and all of them were carried out without any pause. That could explain it.
We can see here as well that a relatively good processor such as E6600 doesn’t have much to compete against itself when it comes to overclocking, as it scores a mere 6715 points at stock frequencies, whereas it gets about 8200 points at 3.3 GHz already. This overclock can be reached with the standard cooler.
With these tests, we want to show you that there is a great deal of free performance to be gained with overclocking, and even if this isn’t a guide of any sort, we hope that more people will try overclocking their computers.
There is still a summary to compile and discuss. Click your way to the next page.
After using Gigabyte’s excellent GA-965P-DS3 for a while, it felt like things could hardly get better. Abit has gotten its act together since the initial problems with the AB9 series and has launched a very competent and solid card, that in spite of the steep price can be considered worth its price if you’re a fan of overclocking.
µGuru
Sure, there is one problem that can be potentially devestating, which is the software µGuru’s settings for memory voltages. It reports lower VDimm values than the actual voltage, which makes it very easy to bust a pair of memory sticks, according to reviews on other sites. And surely enough, it is correct. At the time of the review being written, the memory voltage is set at 2.25 V, while µGuru reports it as 2.15 V. By purely practical reasons, we didn’t feel like toasting 2 GB of nice memory, which is why we refrained from altering the memory voltage in Windows.
We have to add the fact that µGuru is an extremely competent application with several configurable profiles. Any voltage can be set here, without any problems whatsoever. Frequencies can be changed aswell, and there are seven different profiles that can be applied at any time. These profiles can be associated with different programs, so if you would like, you could use a very advanced form of EIST while using Windows, or automatically overclocking your computer when you start a chosen program. Add configurable fan speeds on every connector on the motherboard, and several reference temperatures to control these with, and you’ve got yourself a nice set of features. Not just overclocking, but also generous underclocking possibilities.
The little blot that could be seen in BIOS can also be found here. No timings can be set from µGuru, neither can the multiplier for the CPU, which would have been a great feature to use a low frequency to run the CPU in. It is still a great program with tons of features, at any given time.
Overclocking
And then there’s the overclocking, of course. Perhaps we are a bit tempered from all the results we’ve seen over the Internet with 550+ MHz FSB’s, which is why we’re almost disappointed in the overclocking potential in this board. Sure, 520 MHz on the FSB is good for almost everything, except if you have an E6300 that you want to overclock a lot, but for about 2000 SEK, you would want a board that clocks very well. Though this time we didn’t use any poor E6300’s that couldn’t get over 485 MHz FSB, but an E6600 with an unidentified max frequency on the FSB. So it could have been the CPU that called quits in this case, but after a quick look around different forums, we can see that AB9 QuadGT generally manages values around 510-520 MHz FSB.
This isn’t a shameful result, though. Quite the contrary. The extremely high expectations we had for this board were perhaps just set too high. Keep in mind that many other boards stops at around 500 MHz FSB, which is a very good value in itself. The board itself is simply very good, and there is overclocking potential for almost everyone. This is of course on an unmodified board. If you were to give it a few tweaks here and there, you could probably get even higher.
Add these things to extreme stability, like the previously reviewed Gigabyte GA-965P-DS3 (even better, in fact), and you’ve got yourself a board that is nothing less than a dream to overclock with. We haven’t found any frequencies that were "almost" stable because of the motherboard. The CPU temperature was the limiting factor in our tests using air cooling.
Voltages
What about the voltages, then? Well, they get a little unstable during load, but more or less every board does this. There are tons of settings for voltages, and don’t leave much to be wished for. Take 3.0 V for the memory, for example, which is more than enough to toast any memory with regular air cooling. What the manufacturer thought when it gave us this setting is unclear, but it is ambitious and generous to offer the freedom of choice that many manufacturers refrain from. If you want to be a really mean, you could whine a bit about the highest possible VCore, 1.85 V, as this could possible be a little low for LN benchmarking. We settled for 1.78V with the Vapochill, but it doesn’t really have the same cooling capability as a good pipe with liquid nitrogen.
In addition to the voltages themselves, the board offers great intervals between different voltages, that lets us set the voltage with precision rarely seen before. Certainly there settings just as good on many cards, but this feature combined with the rest of the nice and clean BIOS on the AB9 QuadGT makes life more fun.
Summary
Abit AB9 QuadGT is simply a very solid card with tons of nice features, and overclocking potential that should satisfy almost every user. Even the physical layout is of top class, as are the possibilities for further expansion like eSATA ports, HDMI sound and so on. Maybe you could miss an additional Ethernet port, or even an extra SATA port if you want to win those wars. This is something that we sacrifice gladly for the terribly stable management, and if something were to go wrong, there’s a LED panel on the board for troubleshooting purposes, in addition to a CCMOS switch on the I/O plate.
In other words, a board for those of you who want to overclock your computer and value stability, those of you who aren’t in need of 10 to 15 SATA ports or two or more Ethernet ports. Without a doubt, surely worth its price in spite of the price itself.
|
|
|
abit AB9 QuadGT |
|
Pros Cons |
We would like to thank Abit for supplying us with the board for evaluation.


